copier1.math.ucsb.edu & copier2.math.ucsb.edu - Ricoh MP 7503
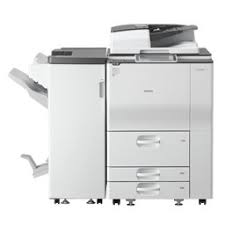 copier1 and copier2 are large, high-speed printer/copiers with duplexers and staplers. They are suitable for large print jobs. They can also scan documents and email them, although that isn't covered in this document.
Mac instructions (macOS 13.x "Ventura")
- Download and install the printer driver.
- Go to http://support.ricoh.com/bb/html/dr_ut_e/rc3/model/mp6503/mp6503.htm
- Choose your OS from the list. (If you aren't sure what OS version you have, click the Apple menu and choose "About This Mac".)
- Click the "Download" button for the PPD installer.
- Open the dmg file you downloaded, and double-click on the pkg file inside.
- As part of the installation you may be asked to enter your password. If your password doesn't work here, you don't have administrative privileges and should contact sysadmin@math.ucsb.edu to set up your printer.
- Click the Apple Menu and choose "System Settings".
- Scroll to the bottom of the left column and click "Printers & Scanners"
- Click the "Add Printer, Scanner, or Fax..." button. The Add Printer dialog appears.
- Click the globe icon in the dialog toolbar.
- Fill out the dialog fields as follows:
- Address: copier1.math.ucsb.edu or copier2.math.ucsb.edu
- Protocol: AirPrint
- Queue: leave blank
- Name: Can be anything you want; I suggest something like "Copier 1 (Ricoh)"
- Use: Should automatically detect as "RICOH MP 7503 PS3"
- Click "Add". The printer is now ready to use.
Mac instructions (older OS versions)
- Download and install the printer driver.
- Go to http://support.ricoh.com/bb/html/dr_ut_e/rc3/model/mp6503/mp6503.htm
- Choose your OS from the list. (If you aren't sure what OS version you have, click the Apple menu and choose "About This Mac".)
- Click the "Download" button for the PPD installer.
- Open the dmg file you downloaded, and double-click on the pkg file inside.
- As part of the installation you may be asked to enter your password. If your password doesn't work here, you don't have administrative privileges and should contact sysadmin@math.ucsb.edu to set up your printer.
- Click the Apple menu and choose "System Preferences"
- Click "Printers & Scanners"
- If there's a padlock at bottom left, click it, then enter your password to unlock the settings. (If your password doesn't work here, you don't have administrative privileges; contact sysadmin@math.ucsb.edu to handle setting up your printer.)
- Click the + at the lower left, under the list of printers.
- If you get a drop-down list, click "Add Printer or Scanner..."
- In the toolbar at the top, click "IP", or the globe icon.
- Fill out the dialog fields as follows:
- Address: copier1.math.ucsb.edu or copier2.math.ucsb.edu
- Protocol: AirPrint
- Queue: leave blank
- Name: Can be anything you want; I suggest something like "Copier 1 (Ricoh)"
- Use: "RICOH MP 7503 PS3" should come up automatically.
- Click "Add". The printer is now ready to use.
Windows instructions
Tested on Windows 10.Known issue: It is not possible to change the name of a printer installed this way. This appears to be a Windows limitation.
- Download and install the PostScript3 driver for the printer.
- Go to http://support.ricoh.com/bb/html/dr_ut_e/rc3/model/mp6503/mp6503.htm
- Near the bottom of the list, click the download button under PostScript3 Driver.
- Double-click the file you downloaded to start the installer.
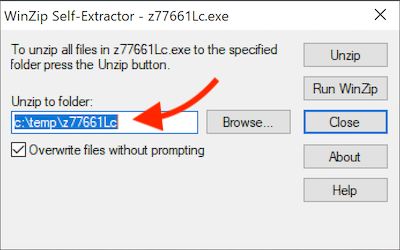
- A WinZip Self-Extractor window will pop up. Click "Unzip"
- Before closing the self-extractor dialog, note the folder it unzipped to, for example C:\temp\z77661Lc
- Click the Start button or search bar, and type "printers". Click Printers & scanners.
- Click Add a printer or scanner.
- Click The printer that I want isn't listed
- Click Select a shared printer by name
- Enter http://copier1.math.ucsb.edu/printer or http://copier2.math.ucsb.edu/printer depending on which of the two you're adding.
- Click Next.
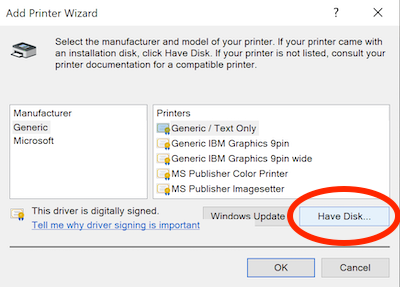
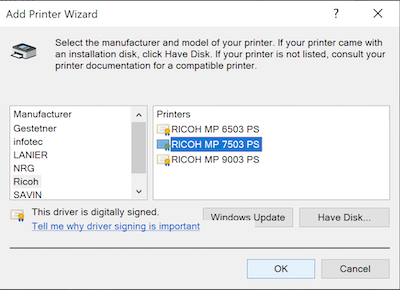
- The Add Printer Wizard will pop up, asking you to select the manufacturer and model of the printer. Click Have Disk...
- The Install From Disk dialog will open. Click Browse
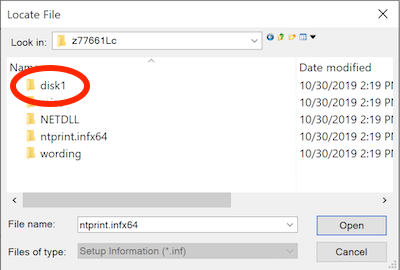
- Use the Locate File dialog to browse to the folder you noted in step 2, then double-click on disk1. You should see a file called "oemsetup". Click Open, then OK
- Under manufacturer, select Ricoh. Under printers, select RICOH MP 7503 PS. Then click OK
- Note: You must be connected to the campus WiFi (or campus wired network) for this step to succeed.
- Note: You must be connected to the campus WiFi (or campus wired network) for this step to succeed.
- There will be a delay here while Windows connects to the printer and sets up the driver. Eventually, it should pop up a dialog telling you the printer has been successfully added. Click Next
- Click Finish
- Finally, we need to tell Windows what options the printer has installed:

- In the Printers & scanners control panel, click on the new printer. (It will be called "IPP Printer on..." and the URL you entered earlier.)
- Click Manage
- Click Printer properties
- Click the Accessories tab.
- Uncheck Automatically Update Printer Information
- Uncheck Copy Tray
- Check Large Capacity Tray
- Check Finisher SR4120
- Click OK
- The installation is complete and the printer is ready to use.
ChromeOS
- Open "Settings"
- Click "Advanced"
- Click "Print and scan"
- Click "Printers"
- Click "Add printer" (the printer icon with a + superimposed on it)
- Use the following settings:
- Name: Whatever you like -- for example "Copier1" or "Copier2".
- Address:
copier1.math.ucsb.eduorcopier2.math.ucsb.edu - Protocol: Internet Printing Protocol (IPP)
- Queue:
ipp/print
- Click "Add"
- The first time you print to this printer, you'll need to click "See more" in the print destination list to see it. After that it should show up in the default list.
Linux instructions
Ubuntu (may also work on other distributions that use the GNOME desktop)
- Open "Settings" and choose "Printers".
- Click "Add a printer..." or "Add..."
- In the search box, type "copier1.math.ucsb.edu" or "copier2.math.ucsb.edu"
- Click "MP-7503"
- You may be asked to select a driver. Choose "PDF-Ricoh".
- Click the gear icon next to the printer and choose "Printing options"
- Click "Installable options" in the left sidebar.
- Set "Large capacity tray" to "Installed"
- Set "Finisher" to "Finisher SR4130"
Generic (for other distributions)
Using the CUPS interface at http://localhost:631/, or whatever other tool you prefer, configure the following:- Protocol: Internet Printing Protocol (IPP)
- Connection: http://copier1.math.ucsb.edu/printer or http://copier2.math.ucsb.edu/printer
| I | Attachment | Action | Size | Date | Who | Comment |
|---|---|---|---|---|---|---|
| |
Ricoh-MP_7503-PDF-Ricoh.ppd | manage | 112 K | 21 Sep 2018 - 18:36 | DavidBrodbeck |
Edit • Attach • Print version • History: r7 < r6 < r5 < r4 • Backlinks • View wiki text • Edit wiki text • More topic actions